
Tutorial: How to Setup SageMaker for Machine Learning CI/CD Pipelines
With the advent of “bigger and badder” machine learning models and their usage in production, it has become necessary to orchestrate the entire MLOps process. This process is often time-consuming, repetitive, and resource-dependent.
The issue is in finding a single platform with all the tools required for automating the process. A typical MLOps pipeline requires multiple tools and services and many don't support automation.
Amazon SageMaker is a fully managed machine learning service. It provides a single platform for building custom automation pipelines that can easily build models, track experiments, and then directly deploy them into a production-ready hosted environment.
In this blog, we’ll see what SageMaker is and what you’ll need to set up before you start creating your pipelines.
What is Amazon SageMaker?
Amazon SageMaker is a cloud-based machine learning platform provided by Amazon Web Services (AWS). It aims to simplify the process of building, training, and deploying machine learning models at scale. With Amazon SageMaker you can
- Clean, and transform your data before using it for training.
- Use a variety of algorithms and frameworks like TensorFlow, PyTorch, Scikit-learn, XGBoost, and more with distributed training capabilities.
- Automate your hyperparameter tuning, deploy your model as a real-time endpoint, and monitor deployed models and experiment metrics.
- Get direct integration with other AWS services like Amazon S3, AWS Identity, Access Management (IAM) and so much more!
Overall, Amazon SageMaker provides a comprehensive environment for building, training, and deploying machine learning models, making it easier for both beginners and experienced practitioners to work on machine learning projects in the cloud.
How to Set up SageMaker for CI/CD
The idea behind CI/CD is that when definitive changes are made to one of the project components (code, data, labels, parameters, etc.), the setup custom pipeline is triggered to automatically deploy the change. This process has 2 essential components:
- The Codebase that contains the updated algorithm
- The script that automates the deployment process when a change is made to the code base.
In addition to those components, basic setup and structuring are required. Let’s explore what they are and how to set them up.
How to connect SageMaker to DagsHub
Since we’re working on MLOps pipelines, we’ll need more than just version control. DagsHub allows you to store all your project components such as data, code, models, experiments, labels, and more in a unified platform with the ability to compare between code and experiments, share projects and data sources, comment over files, and more.
To connect your SageMaker Repo to Dagshub, follow these simple steps:
AWS Console:
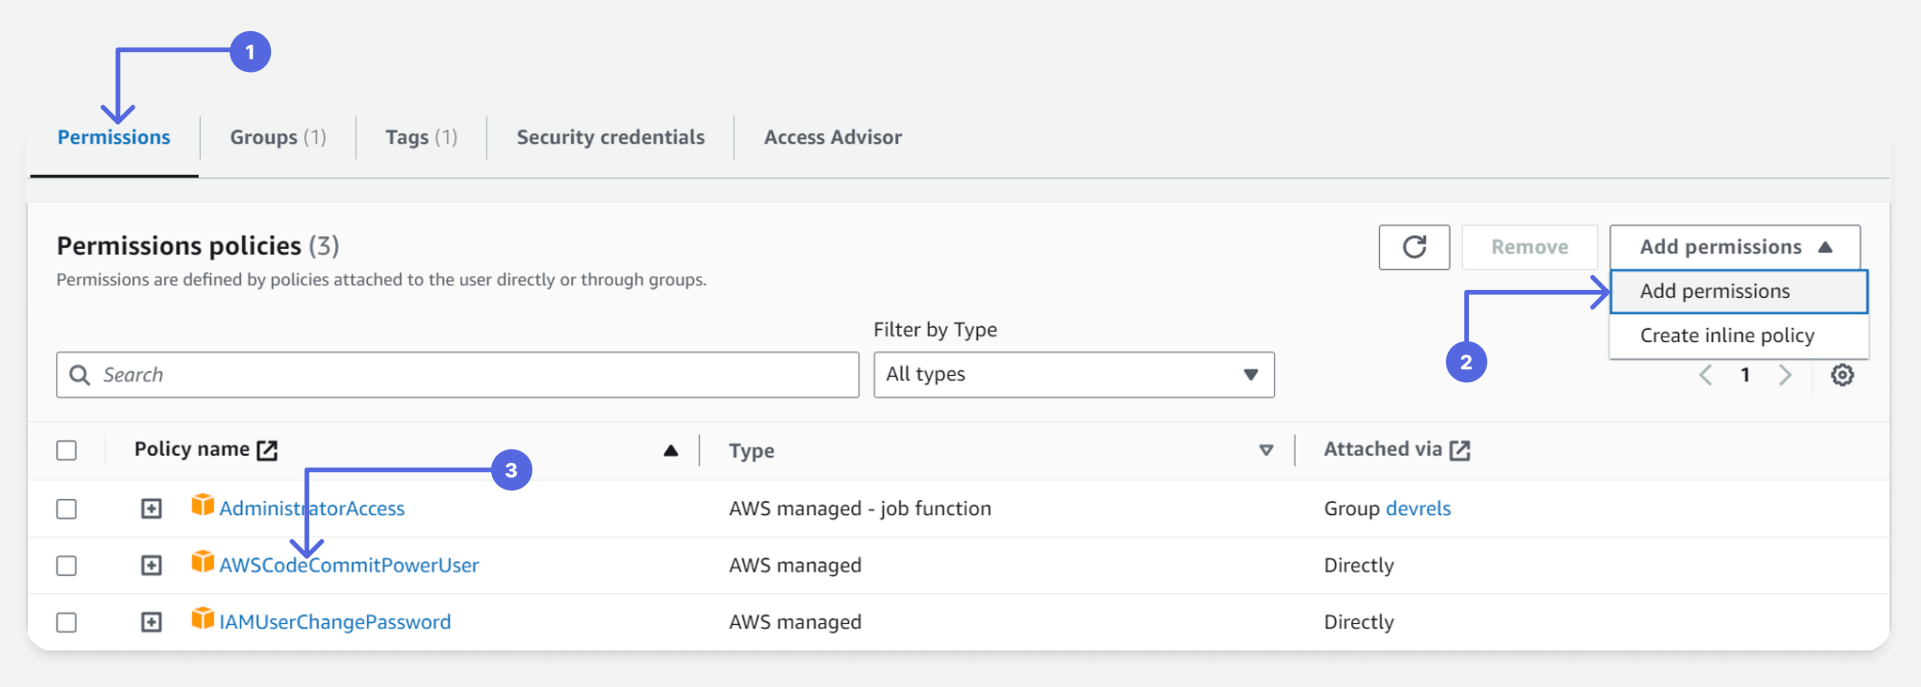
- Log in to your AWS console and head on over to IAM
- Under Access management > Users > {User working on project}
- The above user requires 2 settings to be configured
- Under the Permissions tab, add permission > attach policies directly > AWSCodeCommitPowerUser
2. Under Security credentials > HTTPS Git credentials for AWS CodeCommit > Generate Credentials

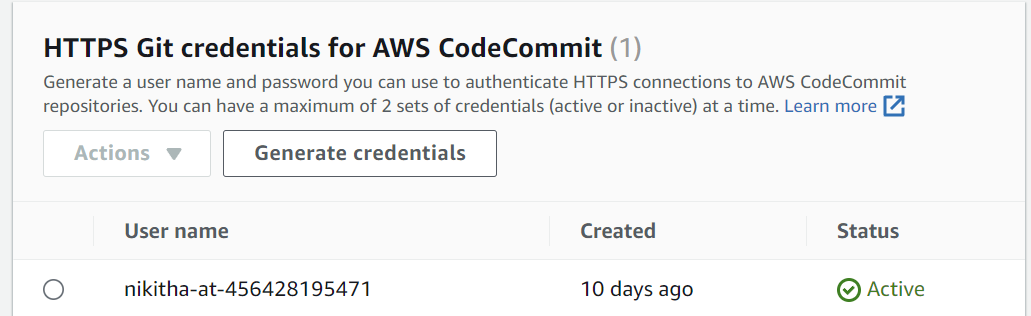
(This is confidential, download and store it somewhere safe, you’ll need it for your DagsHub setup)
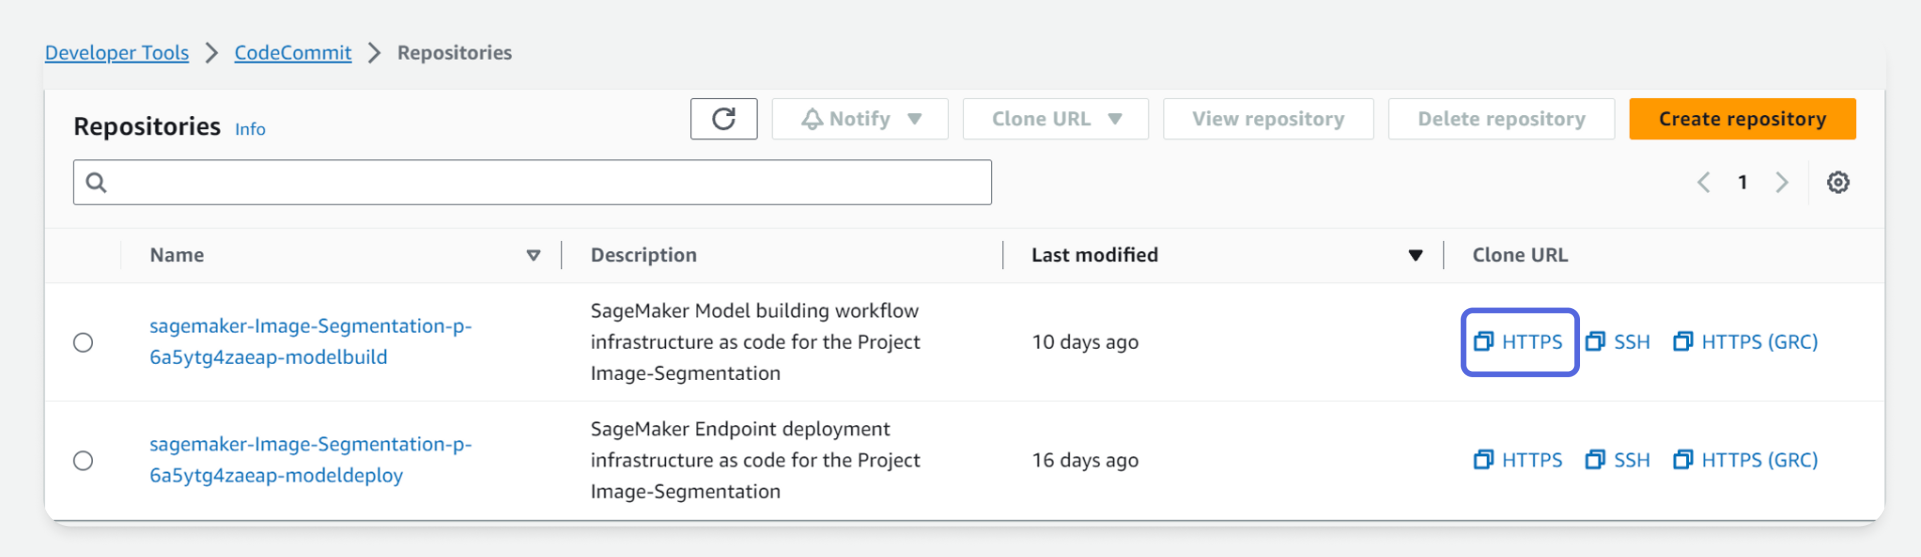
- Head on over to CodeCommit and select your project repositories. If you do not have one, create a blank repository. Each Repository contains 3 clone URLs. Copy the HTTPS URL
Dagshub:
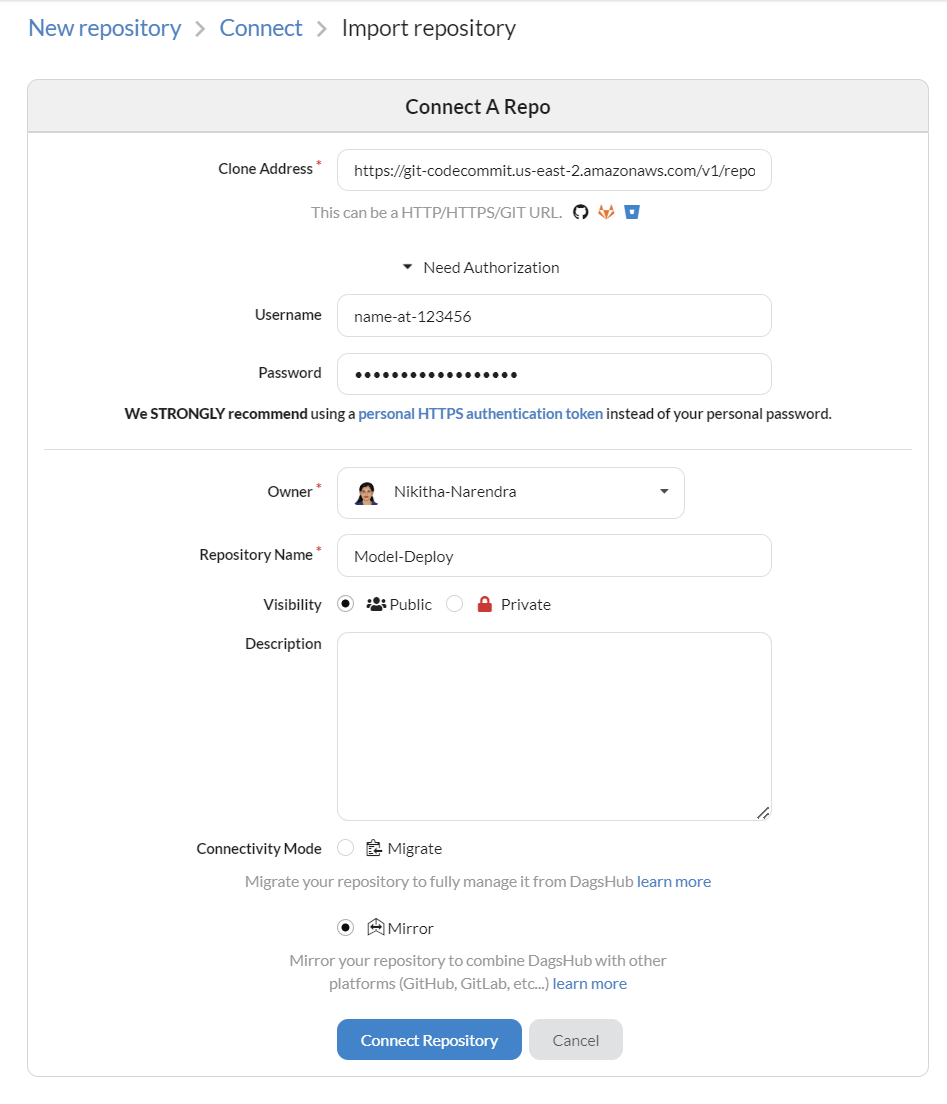
- Login or signup to DagsHub
- Click on Create > New Repository > Connect a Repository > Other
- Enter the HTTPS URL you copied from CodeCommit. Under Need Authorization, add the secret credentials you downloaded from step 3b above
- Add a name to the repository.
- IMPORTANT: Select Connectivity Mode - Mirror. This synchronizes that changes between DagsHub and CodeCommit.
Setting an IAM role
To ensure pipelines are run only by authorized people and to ensure they use only authorized resources, permissions are required to be setup. To setup necessary permissions:
- login to your AWS console
- Under IAM go to Roles
- Create an AWS service role
- Under " Use cases for AWS services" : choose SageMaker > SageMaker - Execution
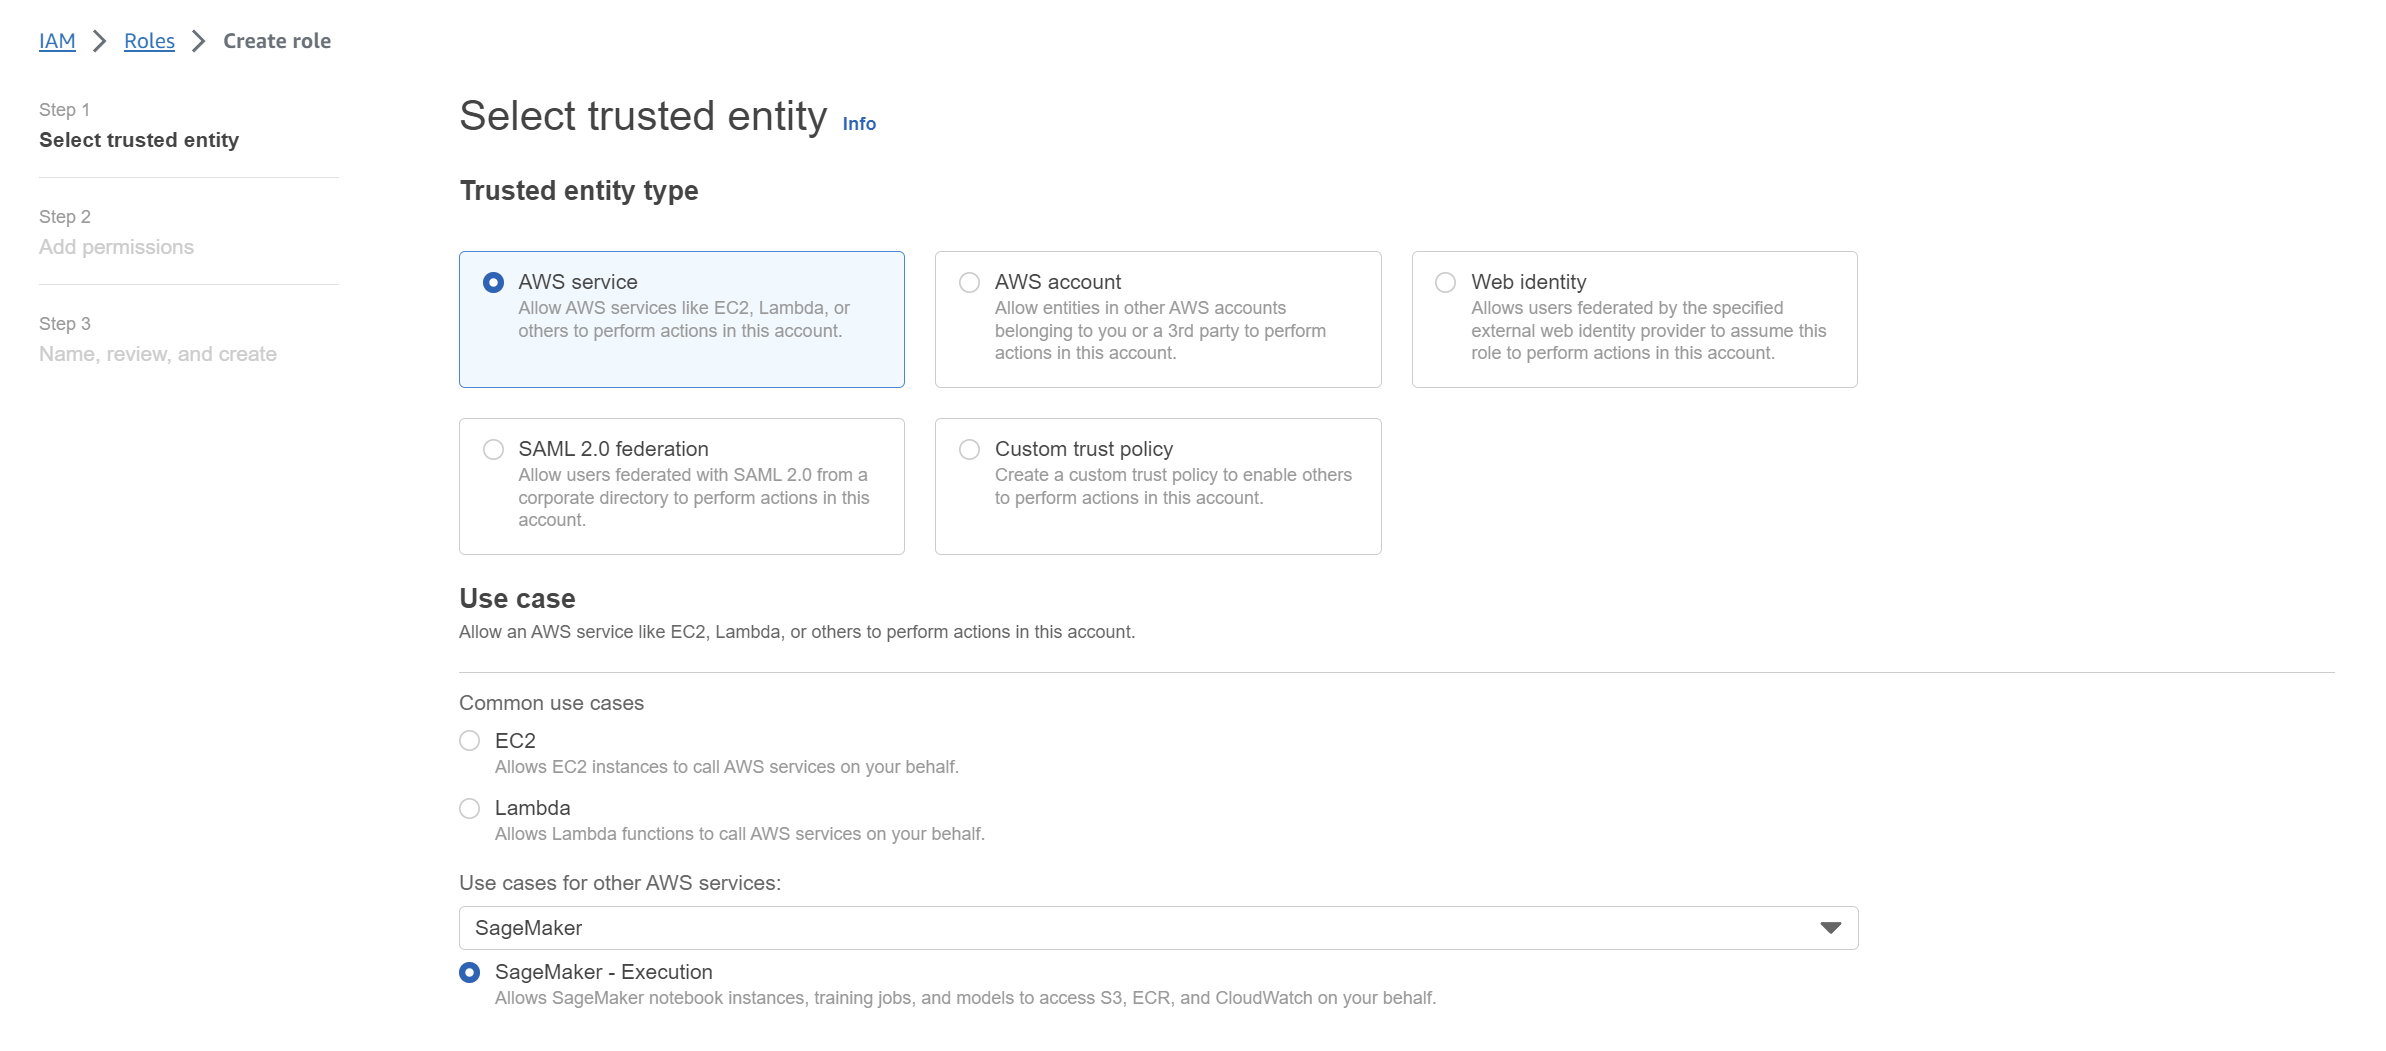
- Give your role a name and create it.
- Edit role policy - Since we’ll be working with S3 buckets. Let's add this permission to our role
- Under Add permission select Attach Policies
- Search for the following permissions and add them:
- AmazonS3FullAccess
- AmazonSageMakerServiceCatalogProductsUseRole
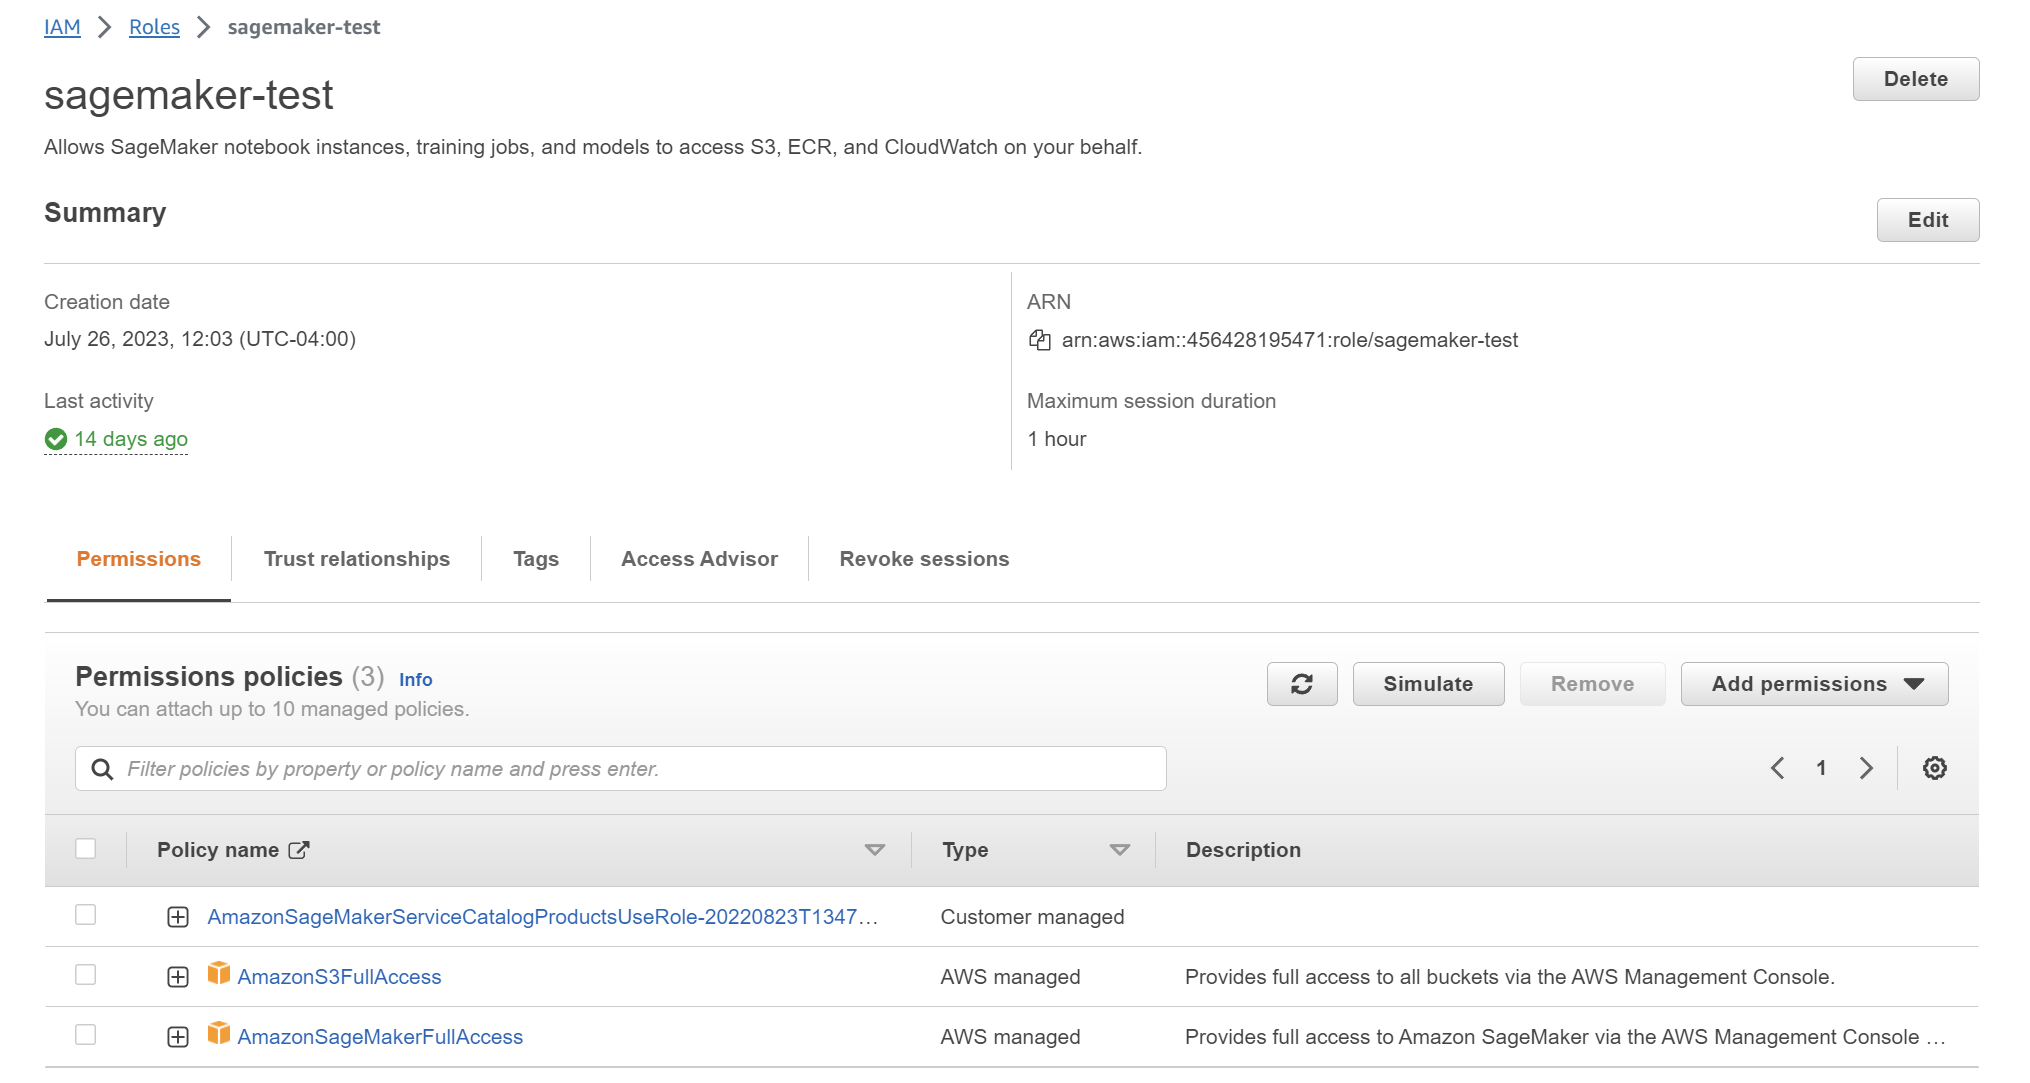
Your role must have these 3 permissions. Furthermore, edit the AmazonSageMakerServiceCatalogProductsUseRole role with the following policy:
{
            "Effect": "Allow",
            "Action": [
                "s3:CreateBucket",
                "s3:DeleteBucket",
                "s3:GetBucketAcl",
                "s3:GetBucketCors",
                "s3:GetBucketLocation",
                "s3:PutBucketCors",
                "s3:PutObjectTagging",
                "s3:PutObjectAcl"
            ],
            "Resource": [
                "arn:aws:s3:::aws-glue-*",
                "arn:aws:s3:::sagemaker-*",
                "arn:aws:s3:::<your-bucket>/*"
            ]
        },
        {
            "Effect": "Allow",
            "Action": [
                "s3:AbortMultipartUpload",
                "s3:PutObject",
                "s3:PutObjectAcl",
                "s3:GetObject",
                "s3:GetObjectAcl",
                "s3:DeleteObject",
                "s3:GetObjectVersion"
            ],
            "Resource": [
                "arn:aws:s3:::aws-glue-*",
                "arn:aws:s3:::sagemaker-*",
				"arn:aws:s3:::<your-bucket>/*"
            ]
        },
Setting up a Project Structure
An automation pipeline needs to have a structure so that it can be run in sequential order. The structure of a pipeline can vary depending on the task. Amazon SageMaker provides templates for different kinds of automation pipelines.
You can always create your own pipeline, but let’s walk through one of the templates to get an idea of what a pipeline project structure looks like.
To create a project from a template:
- AWS Console > SageMaker
- SageMaker Studio > Deployments > Projects
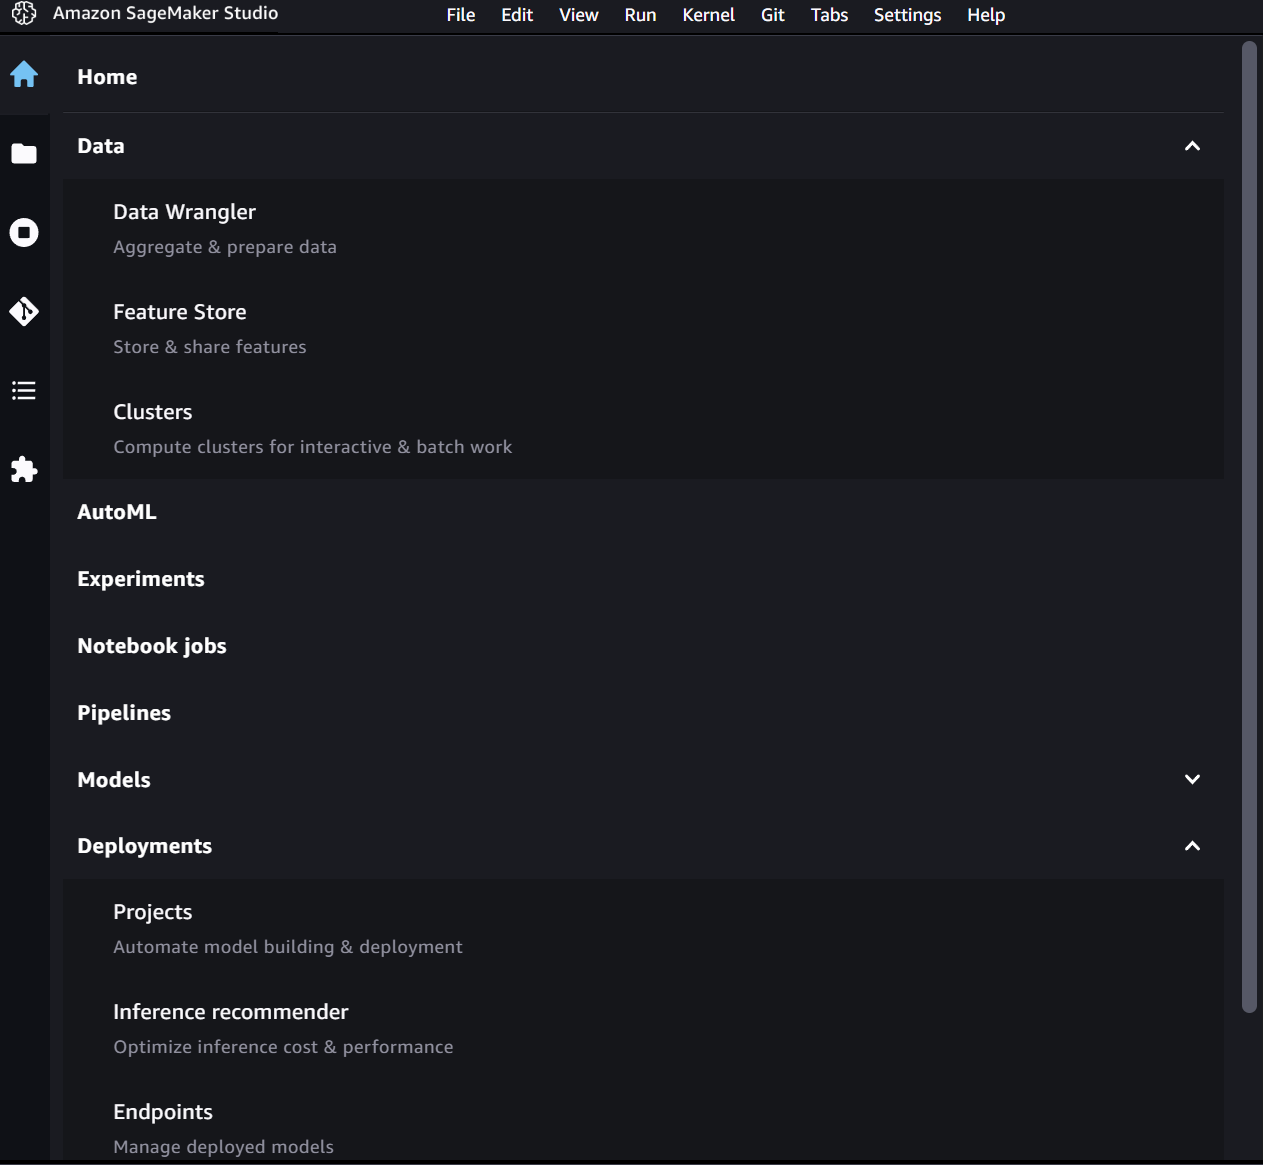
- Under “Create Project” you will see multiple templates. Choose a template that defines your task. We use the “model building, training, and deployment” pipeline. Give your project a name and create it.
- In your project, you will see 2 repositories created. Once for model building and one for model deployment
Let's take a look at what the structure of the model build repository is like:
|-- codebuild-buildspec.yml
|-- pipelines
    |-- abalone # you can always change this to your own project name
        |-- train.py
        |-- __init__.py
        |-- pipeline.py,
        `-- preprocess.py
    |-- get_pipeline_definition.py
    |-- __init__.py
    |-- run_pipeline.py
    |-- _utils.py
    `-- __version__.py
|-- README.md
|-- sagemaker-pipelines-project.ipynb
|-- setup.cfg
|-- setup.py- The root directory should generally contain any configuration, setup, or build script that contains instructions necessary to set up the environment of the project.
- The pipeline folder contains files that describe the functioning of a pipeline and files that run the stages of a pipeline. It also contains a subfolder for the core logic of the project.
- The project folder contains the core logic of your project. This includes files that must be run at different stages of the pipeline - Data Collecting, Preprocessing, Training, Evaluating, Registering, etc. If you require different dependencies for different stages, create subfolders for each stage and define a requirements file for each subfolder. This folder must also contain the pipeline file that defines the parameters and steps of your custom pipeline.
Designing the Automation Script
Build scripts are .yml files that contain sets of instructions and configurations that define how to create and configure machine learning models and associated resources. These scripts are typically used during the build phase of the pipeline to transform raw data into trained models.
How do I create one?
Here’s an example of what a buildspec.yml file looks like:
version: 0.2

env:
	variables:
		S3_BUCKET: my-bucket
phases:
  install:
    runtime-versions:
      python: 3.8
    commands:
      - pip install --upgrade --force-reinstall . awscli
	pre_build:
		commands:
			- echo "Installing dependencies..."
  build:
    commands:
      - export PYTHONUNBUFFERED=TRUE
      - export SAGEMAKER_PROJECT_NAME_ID="kvasir-pipeline-example"
      - run-pipeline --module-name pipelines.kvasir.pipeline \
          --role-arn $SAGEMAKER_PIPELINE_ROLE_ARN \
          --tags "[{\"Key\":\"sagemaker:project-name\", \"Value\":\"${SAGEMAKER_PROJECT_NAME}\"}, {\"Key\":\"sagemaker:project-id\", \"Value\":\"${SAGEMAKER_PROJECT_ID}\"}]" \
          --kwargs "{\"region\":\"${AWS_REGION}\",\"role\":\"${SAGEMAKER_PIPELINE_ROLE_ARN}\"}"
      - echo "Create/Update of the SageMaker Pipeline and execution completed."
	post_build:
		commands:
			- echo "Training Complete..."
artifacts:
	files:
		- package.json
    - package-lock.json
This is the general structure of a build script. Depending on your needs you can modify the phases.
env: These are the list of environment variables that are required for the project. You can also manually set it in CodeBuild
Phases: These are commands that are executed during each phase of the build. The specific order they are executed is: Install, pre_build, build, and post_build.
- Install: install packages in the build of the environment.
- pre_build: commands that run before the build.
- build: commands that run during the build.
- post_build: commands that run after the build
Artifacts: This is where we can find the build outputs. CodeBuild will pass these artifacts back to CodePipeline when the job is done.
Overall, build scripts help streamline the process of building, training, and deploying machine learning models by providing a consistent and reproducible way to manage the different stages of the machine learning lifecycle.
Conclusion
Now you have everything required to set up your very own CI/CD pipeline. Depending on your task, adjust the roles, permissions, and resources, change the contents of your project folder, and update the build script for the required task.
With 3 simple changes, you can you your setup for any project.
REMEMBER: Keep an eye on your tasks, and clean up the resources if you're done with them. (Those bills are so scary they make you laugh 😬)
Happy Coding!