Docker for Data Science – A Step by Step Guide
By the end of this post, you will have a ML workspace running on your machine via Docker, packed with the ML libraries you need, VSCode, Jupyter Lab + Hub and a lot of other goodies.
A lot has already been said about why Docker can improve your life as a data scientist. I was working on an (un-)cool depth estimation project using Fast.ai, with a few friends when I stumbled upon this tweet by @jeremyphoward.
How do you ensure you don't accidentally stop your image without committing, and losing all your changes? Do you use mounts? How do you keep your environment up to date (e.g CUDA updates, python lib updates, etc)?
— Jeremy Howard (@jeremyphoward) August 26, 2020
Has anyone written a simple step-by-step guide to all this?
It so happens that we were using Docker to create our data science workspace for the project, so I thought it would make sense to address Jeremy's questions and share this knowledge with the community.
I'll very briefly review the core concepts and advantages of Docker, and then show a step-by-step example for setting up an entire data science workspace using Docker.
If you already know what Docker is and why it's awesome, skip to the step-by-step tutorial.
What is Docker?
Docker is a tool for creating and deploying isolated environments (read: virtual machines) for running applications with their dependencies.
A few terms you should be familiar with (including a baking analogy for ease of understanding):
- Docker Container – A single instance of the application, that is live and running. In our analogy, this is a cookie.
- Docker Image – A blueprint for creating containers. Images are immutable and all containers created from the same image are exactly alike. In our analogy this is the cookie cutter mould.

- Dockerfile – A text file containing a list of commands to call when creating a Docker Image. In our analogy this is the instructions to create the cookie cutter mould.
Why (as a data scientist) should I care?
Broadly, there are two use cases for Docker in ML:
- Run Only: A run-only container means you edit your code on a local IDE and run it with the container so that your code runs inside the container. Here is one good example.
- End-to-End Platform: An end-to-end platform container means you have an IDE or Jupyter Notebook / Lab, and your entire working environment, running in the container, and also run the code inside it (with the exception of the working file system which can be mounted).
We will focus on the second use case.
Reasons to use Docker in data science projects
Using docker containers means you don't have to deal with "works on my machine" problems.
Generally, the main advantage Docker provides is standardization. This means you can define the parameters of your container once, and run it wherever Docker is installed. This in turn provides two major advantages:
- Reproducibility: Everyone has the same OS, the same versions of tools etc. This means you don't need to deal with "works on my machine" problems. If it works on your machine, it works on everyone's machine.
- Portability: This means that moving from local development to a super-computing cluster is easy. Also, if you're working on open source data science projects, like we do at DAGsHub, you can provide collaborators with an easy way to bypass setup hassle.
Another huge advantage – learning to use Docker will make you a better engineer, or turn you into a data scientist with super powers. Many systems rely on Docker, and it will help you turn your ML projects into applications and deploy models into production.
Examples of data science oriented docker containers
- pytorch/pytorch - a simple container for Use Case 1 that includes Pytorch
- jupyter/scipy-notebook - A container for Use Case 2 that includes Jupyter as the UI, and many python data science modules.
- DAGsHub/ml-workspace-minimal - Is the container I'll show the step-by-step guide on. This container is an updated version from the ml-tooling/ml-workspace repository. The original has not been maintained for the last 7 months so I created an up to date version. It combines the following tools:
- 💫 Jupyter, JupyterLab
- 👾 VSCode web-based IDE.
- 🗃 Pytorch, Tensorflow, Sklearn, Pandas, and many other popular data science libraries & tools.
- 🖥 Full Linux desktop GUI accessible via web browser.
- 🎮 Easy terminal access via web browser.
- 🔀 Seamless Git integration optimized for notebooks.
- 📈 Integrated hardware & training monitoring via Tensorboard & Netdata.
- 🚪 Access from anywhere via Web, SSH, or VNC under a single port.
- 🎛 Usable as remote kernel (Jupyter) or remote machine (VSCode) via SSH.
- 🐳 Easy to deploy on Mac, Linux, and Windows via Docker.
Sounds wonderful, right?! Now let's see how to set it up.
Setting up your data science docker container - a step by step guide
Install Docker
Installing Docker is easy and free. Just follow this guide for your operating system.
Building A Docker Image
Will not be covered in this tutorial. Our focus will be on how to run a Docker Container once we already have the image we want.
We will use a prebuilt image from DAGsHub/ml-workspace-minimal. It is created from this repository on GitHub. If you want to build or modify this image or any other, I recommend the article Jeremy Howard refers to in his original tweet.
Docker Run + Addressing all the special modifiers
Just run the following command:
docker run -d \
    -v "/${PWD}:/workspace" \
    -p 8080:8080 \
    --name "ml-workspace" \
    --env AUTHENTICATE_VIA_JUPYTER="mytoken" \
    --shm-size 2g \
    --restart always \
    dagshub/ml-workspace:latest
docker run is the command that takes a Docker Image (cookie cutter) and creates a container from it. In our analogy, this is the step where you make the cookie.
This long command might look scary, but we can think of all these flags as toppings for our cookie (chocolate chips and macadamia nuts 😋). Here is an explanation of the various flags and why you need them:
Mounting your working file system -v "/${PWD}:/workspace"
This might be the most important flag of all. It allows you to retain your work (files) after the container shuts down, and to access them from outside the container.
It does this by mapping your current working folder (where you execute the docker run command), denoted as /${PWD}, to a /workspace folder inside the container's virtual file system. If you'd like to change that, you can change this argument appropriately.
Port forwarding -p 8080:8080
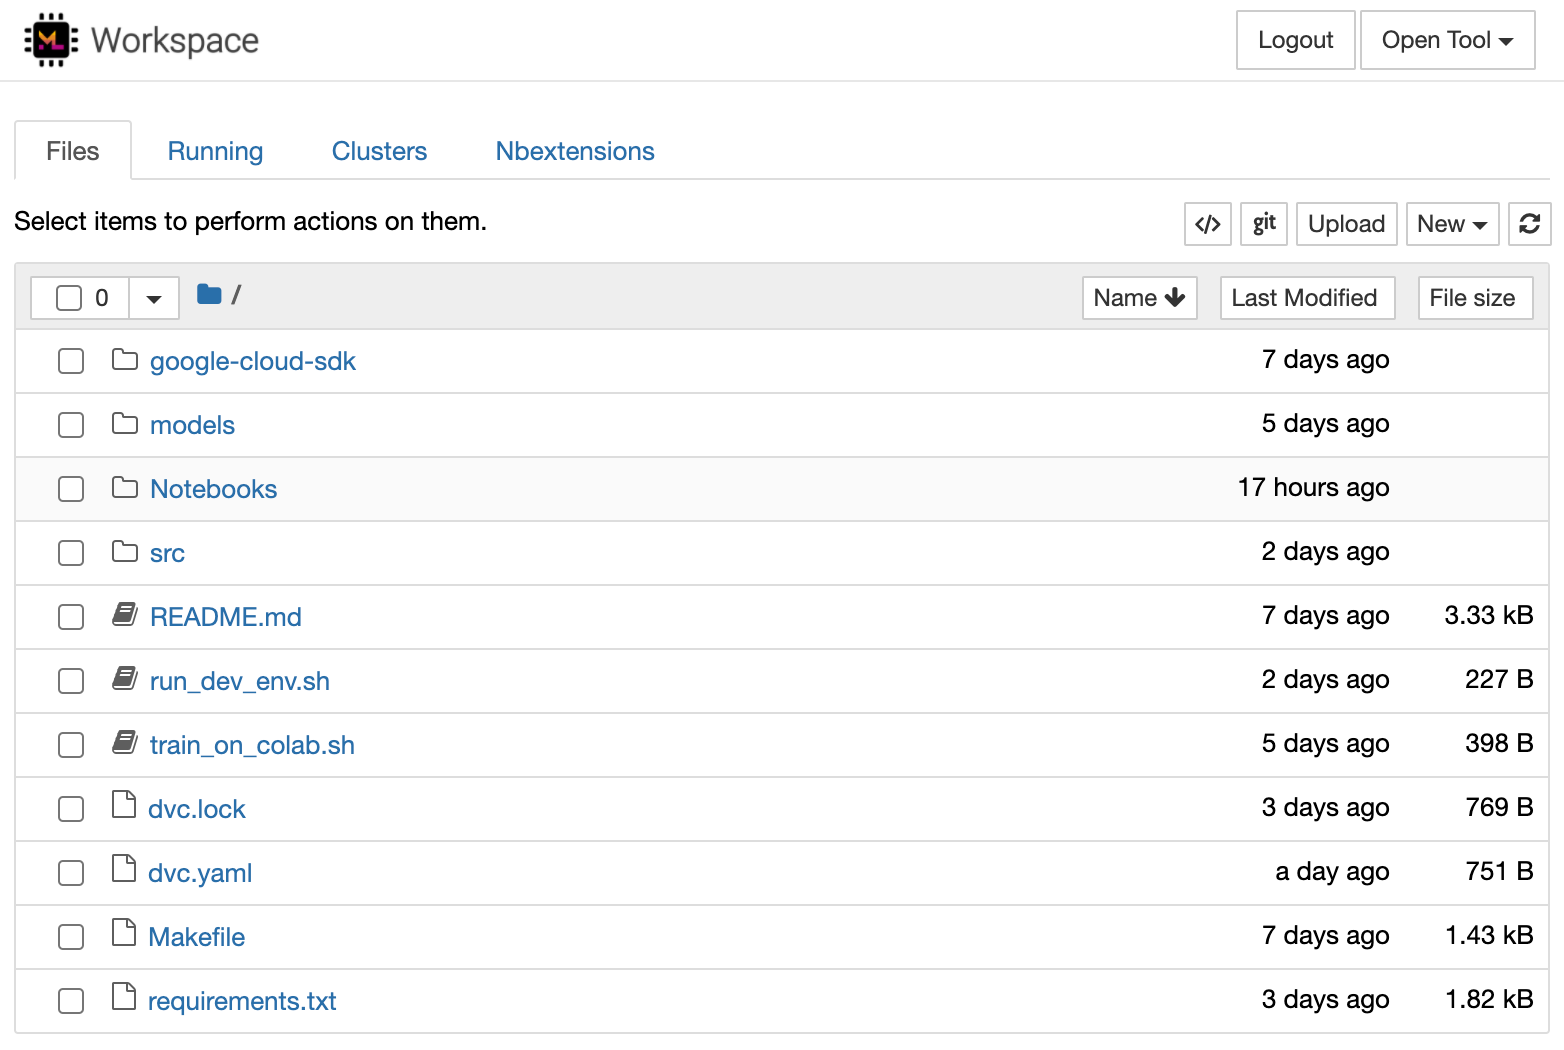
This argument exposes the 8080 port. In essence it means that after you run this on a computer, your container will be accessible via http://{computer-ip}:8080. If you're running this on your local system, that address will be http://localhost:8080. For more complex images, you might need more than one port forwarded for additional reasons such as api endpoints. In our case, the port is the UI endpoint, and will lead you to the home screen of ML-Workspace:
Naming our container --name "dags-workspace"
This generates a unique identifier for our container for future reference. As it might imply, this name should be unique per your system, so if you make multiple containers from the same image, you'll need to define different names for them. --name is also useful to add meaning to our container. If you don't define a name, a meaningless one will be generated for you automatically.
Defining Environment Variables --env AUTHENTICATE_VIA_JUPYTER="mytoken"
The --env flag defines environment variables for your container. This can vary wildly between containers, and so it's hard to give a generic use case for it.
In our case, we use this to define a password to the workspace. When someone opens the link above for the first time, Jupyter will require them to input the password defined here. This might be useful if you're working on a shared computer.

Defining shared memory --shm-size 2g
This flag is used to define the shared memory of your container (the more the better). Remember that this uses the same RAM as your regular system, so if you set it too high it might slow your computer down. A good size would be somewhere between 2g and 8g for most use cases.
Defining the restart policy --restart always
The --restart flag represents the container's restart policy. According to the Docker docs:
A restart policy controls whether the Docker daemon restarts a container after exit.
We use the always option which means Docker will try to keep the container running even if the system restarts. This is great in order to keep your project context intact.
Congratulations! You now have an entire ML workspace running on your docker, including all the goodies you might need.
If you want to dive one level deeper, I recommend going to the docker run command reference to see all available flags.
Additional Setup
Let's go over a few things I recommend you setup to have an ideal workspace.
Setting up a Conda/virtual environment in Docker
We've set a standardized, isolated machine to run our ML. If you're setting up your project for the first time, you're probably running to your environment manager conda/pip to install some awesome packages.
Let me stop you there.
Why go through all this effort to create an isolated, reproducible environment and then go install a bunch of different packages that no one will know about. You should create a Conda or virtual environment to manage your packages. If you decided to use the DAGsHub/ml-workspace-minimal container, here is what you should do:
In the ML workspace home click the Open Tool dropdown and choose Terminal. Then type the following commands:
# Input your <env-name> and the <python-version> you want
conda create -y --name <env-name> python=<python-version>
# Activate your environment
source activate <env-name>

# If you have a `requirements.txt` file, you should install those requirements
pip install -U pip setuptools wheel
pip install -r requirements.txt
After you finish installing your packages, and you want to save your project (and hopefully commit it to Git), you should save your package list by running:
# This will override your existing `requirements.txt`.
# If you want to append, use `>>` instead of `>`
pip list --format=freeze > requirements.txt
Note: Wondering why you should use this command for listing your requirements (instead of pip freeze >> requirements? Read this GitHub issue
Wrapping it up
You now have an isolated, reproducible, portable and awesome ML workspace set up with Docker. I hope you found this article useful, and if you have any questions or feedback, please reach out via our DAGsHub Discord Channel.