
Automatically migrate your project from DVC≤ 0.94 to DVC 1.x
Migrating your project from DVC ≤ 0.94 to DVC 1.x can be a very involved process. Here’s an easy way to do it.
DVC 1.0 is out!
DVC 1.0 is here and with it comes a whole package of long-awaited features. If you are interested in a complete list of new features you should check out DVC’s official release post. One of the main changes is the single dvc.yaml file that stores all the necessary information to describe your pipeline. This creates a clear separation between .dvc files acting as placeholders for cached files in your git repository and the description of the pipeline to run when calling dvc repro.
One caveat to this upgrade is that migrating a repository with a large number of .dvc files to the new format is a rather involved process. In this post, I'll walk you through the process of migrating your existing project from DVC ≤ 0.94 to DVC 1.X using a single automated script, and then demonstrate a way to check that your migration was successful.
Migrate a repository full of .dvc files to the new DVC 1.X YAML format
Setup
- First, open your repository directory in a terminal.
cd path/to/your/repository2. I strongly recommend creating a new branch dedicated to this migration, this will also prove useful later on for comparing the old and new configuration
git checkout -b dvc-1-migration3. Upgrade to the latest DVC 1.X version (now is the time).
# Homebrew (Mac)
brew upgrade dvc

# Chocolatery (Windows)
choco upgrade dvc

# Conda
conda update -c conda-forge dvc

# PiPy
pip install dvc -U
Running the migration script
The fast way — Spare me the details!
I recommend that you carry on reading to take a look at what the script is doing, but if you just want to run the script you can do the following from inside your directory:
curl -L 'https://raw.githubusercontent.com/DAGsHub/Dvc1Migration/master/migrator.py' | python -The long way — I want to understand!
In DVC ≤ 0.94 stages were named after the files containing their details — Dvcfile or <name>.dvc. Since DVC 1 you define the name of the stage and not the name of the file containing it.
This python script provided by one of DVC’s collaborators is converting a single-stage file into a stage inside dvc.yaml and dvc.lock. It takes as arguments an original .dvc file (or Dvcfile) and the name of the stage as it should appear in our new pipeline. This means you have to manually run python migrator.py <file.dvc> <stage_name> numerous times. When it comes to a pipeline with many stages, this might become cumbersome. Moreover, some of the .dvc files don't represent stages in your pipeline but just tracked files cache information. This means they were created by DVC when running the command dvc add or dvc import. These should not appear as stages in your dvc.yaml file.
I took the liberty to alter the script so that it could migrate an entire project with as many .dvc files as I want. In short, it will search for .dvc files that have a "cmd" key, and add their content as a stage in the new format. For example, if you currently have a stage file named train.dvc, the script will assume you want to call the stage train. Feel free to alter this behavior to your liking!
You can download it like this:
curl -L 'https://raw.githubusercontent.com/DAGsHub/Dvc1Migration/master/migrator.py' -OAll the original .dvc files will be backed up as <old_file>.dvc.bak and two new files will be created at the root of your working directory
To run the command:
python migrator.pyThe output should look like this:
Creating 'dvc.yaml'
Adding stage 'featurization' in 'dvc.yaml'
Generating lock file 'dvc.lock'
Adding stage 'training' in 'dvc.yaml'
Updating lock file 'dvc.lock'
Adding stage 'Dvcfile' in 'dvc.yaml'
Updating lock file 'dvc.lock'
...
If you don’t recognize this pattern, feel free to describe your problem in the comments below and I’ll do my best to take a look at it.
Otherwise, start tracking the newly generated files by running:
git stage -u .
git add dvc.yaml dvc.lock
git commit -m "migration to dvc 1"
git push -u origin dvc-1-migration
This will:
- Mark the old
.dvcfiles as deleted in git, while keeping the backup files in your working directory untracked - Add the new
dvc.yamlanddvc.lockto you git tree - Commit and push the branch
dvc-1-migrationto youroriginremote
Almost done
That’s it, you have now migrated your project to DVC 1!

Not so fast! You want to make sure your pipeline is doing the same, and that all your data files are being tracked properly.
Compare your pipelines
Review the YAML files
One option is to manually review the files created and verify that all the stages, deps, outs, and metrics are present and running the correct commands. Alternatively, you can…
Visually compare pipeline graphs
Ideally, you would want to easily look at both your old and new pipeline in a way that will visually depict the differences in both versions. DAGsHub is a platform dedicated to the data science community, that can do that for you, and it supports both DVC 1 and older versions (and also has other cool capabilities). You are welcome to use any other tool you like to visualize the differences, but really I am biased ;-)
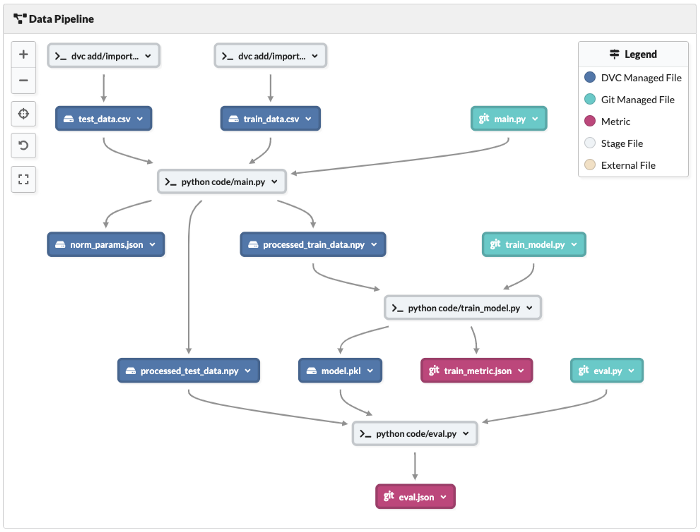
By connecting your existing repository to DAGsHub, you can compare your previous pipeline with the one you created in your branch dvc-1-migration by switching branches.

Note
When computing the DVC 1 pipeline graph, DAGsHub is performing a slightly different computation than with the original .dvc files. This might result in nodes appearing in a different order. Other than that, nodes and edges should still be the same.
Thank you!
Thank you for reading up this point, I hope you found it useful. If you have any suggestions or feedback please leave a comment on the DAGsHub discord channel.