CI/CD for Machine Learning: Test and Deploy Your ML Model with GitHub Actions
- Khuyen Tran
- 9 min read
- 3 years ago

Motivation
Imagine your company is creating an ML powered service. As a data scientist, you might try to continuously improve the existing ML model.
Once you find a better model, how do you make sure the service doesn’t break when you deploy the new model?
Wouldn’t it be nice if you can create a workflow that:
- Automatically tests a pull request from a team member
- Merges a pull request when all tests passed
- Deploy the ML model to the existing service?

In this article, you will learn how to create such a workflow with GitHub Actions.
What is GitHub Actions?
GitHub Actions allows you to automate your workflows, making it faster to build, test, and deploy your code
In general, a workflow will look similar to the below:
name: Workflow Name # Name of the workflow
on: push # Define which events can cause the workflow to run
jobs: # Define a list of jobs
  first_job: # ID of the job
    name: First Job # Name of the job
    runs-on: ubuntu-latest # Name of machine to run the job on
    steps:
      ...
  second_job:
    name: Second Job
    runs-on: ubuntu-latest
    steps:
      ...
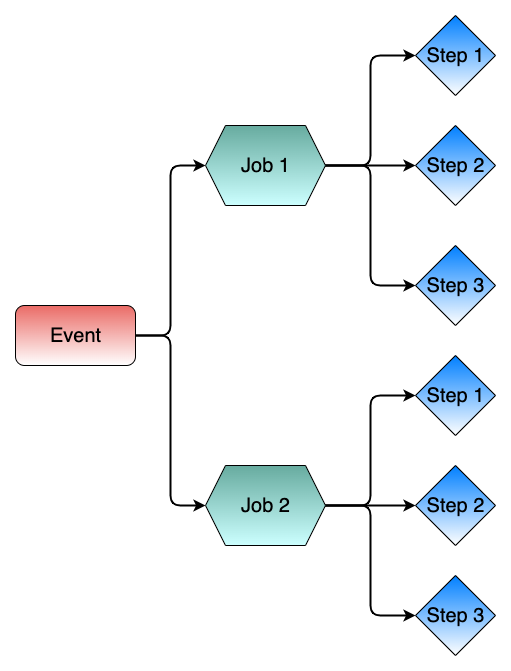
There are 3 important concepts to understand from the code above:
- When an event occurs (such as a push or a pull request), a workflow consisting of one or more jobs will be triggered
- Jobs are independent of each other. Each job is a set of steps that runs inside its own virtual machine runner or inside a container.
- Steps are dependent on each other and are executed in order.
Let’s dig deeper into these concepts in the next few sections.
Find the Best Parameters
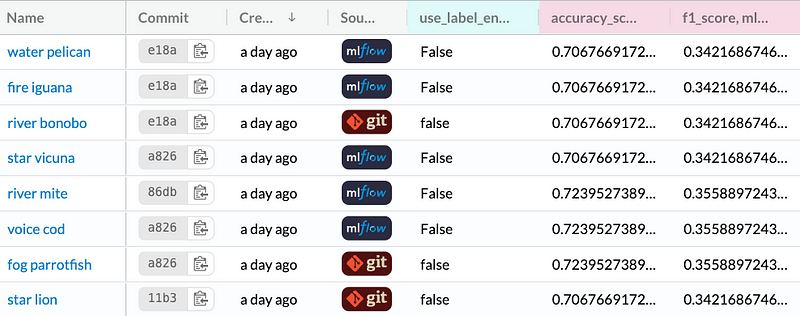
The first steps in an ML project include experimenting with different parameters and models in a non-master branch. In the previous article, I mentioned how to use MLFlow + DagsHub to log your experiments.
DagsHub: a GitHub Supplement for Data Scientists and ML Engineers

Link to the experiments shown above.
Once we found a combination of parameters and models that has a better performance than the existing model in production, we create a pull request to merge the new code with the master branch.
Test Code, ML Model, and Application with GitHub Actions
To make sure that merging new code won’t cause any errors, we will create a workflow that automatically tests the committed code and only allows the one that passes all tests to merge with the master branch.

We will write a new workflow inside a YAML file under .github/workflows .
.github
└── workflows
    └──test_code.yaml
Specify Events
In this workflow, we use on to specify that the workflow will only run :
- If an event is a pull request.
- If the paths of the committed files match certain patterns.
name: Test code and app
on:
  pull_request:
    paths: # Run when one or more paths match a pattern listed below
      - config/**
      - training/**
      - application/**
      - .github/workflows/test_code.yaml
Specify Steps
Next, create a job called test_code , which consists of several steps executed in order.
jobs:
  test_model:
    name: Test new model
    runs-on: ubuntu-latest
    steps:
      ...
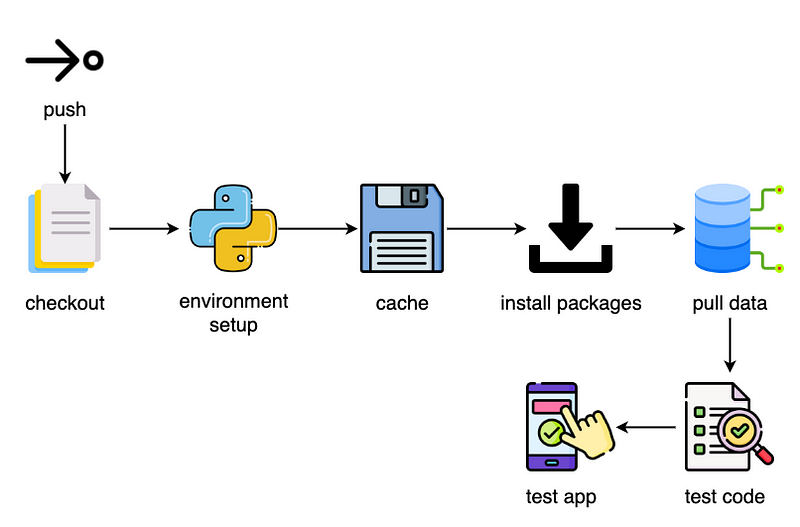
The first few steps will set up the environment before running the code.
steps:
  - name: Checkout # Check out a repo
    uses: actions/checkout@v2

  - name: Environment setup # Set up with a specific version of Python
    uses: actions/setup-python@v2
    with:
      python-version: 3.8
      cache: pip

  - name: Cache # Cache dependencies
    uses: actions/cache@v2
    with:
      path: ~/.cache/pip
      key: ${{ runner.os }}-pip-${{ hashFiles('**/dev-requirements.txt') }}
      restore-keys: ${{ runner.os }}-pip-

  - name: Install packages # Install dependencies
    run: pip install -r dev-requirements.txt

  - name: Pull data # Get data from remote storage
    run: |
      dvc remote modify origin --local auth basic
      dvc remote modify origin --local user khuyentran1401
      dvc remote modify origin --local password MyScretPassword
      dvc pull -r origin train_model
Explanations of the syntax in the code above:
name: A name for your step.usesselects an action, which is **an application that performs a complex but frequently repeated task. You can choose an action from thousands of actions on GitHub Marketplace.withinserts input parameters required by an action.runruns command-line programs using shell.
Explanations of the steps:
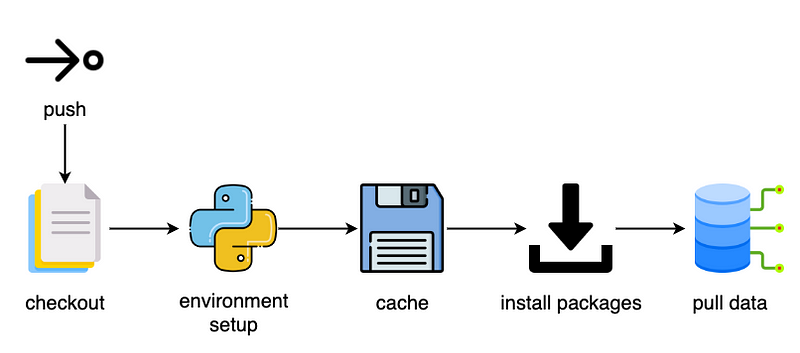
Checkoutchecks out your repository so that the workflow can access files in your repository.Environment setupsets up a Python environment for your workflow (I chose Python 3.8).Cachecaches dependencies so that you don’t need to install dependencies every time you run the workflow.Install packagesinstalls all dependencies your code needs to run successfully.Pull dataauthenticates and pulls data from remote storage. Here, my remote storage is DagsHub.
Note that it is risky to put your username and password in a script that everybody can see. Thus, we will use encrypted secrets to hide this confidential information.
Encrypted Secrets
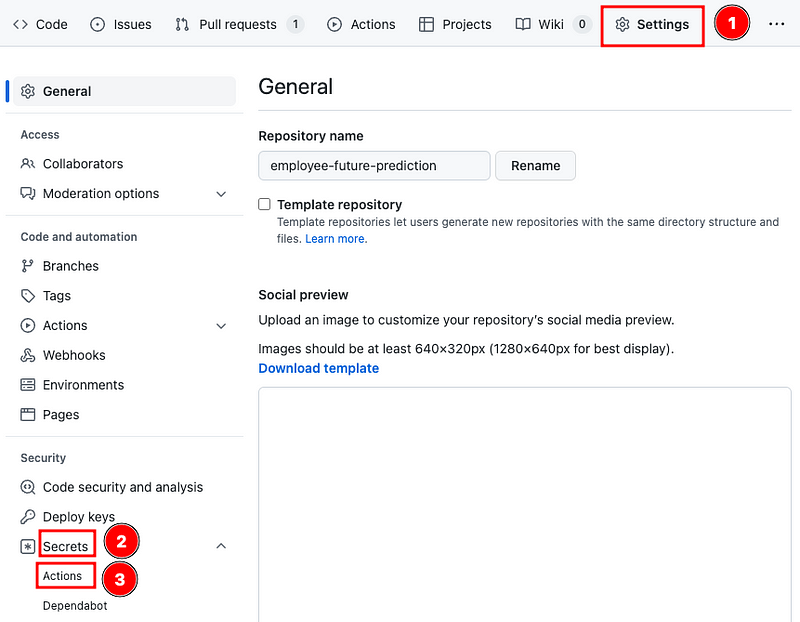
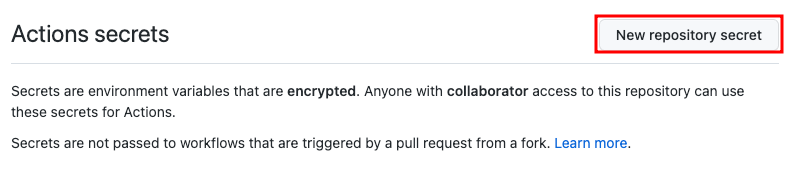
Secrets are encrypted environment variables that you create in a repository. To create a secret, go to your repository, and click Settings → Secrets → Actions → New repository secret.
Insert the name of your secret and the value associated with this name.
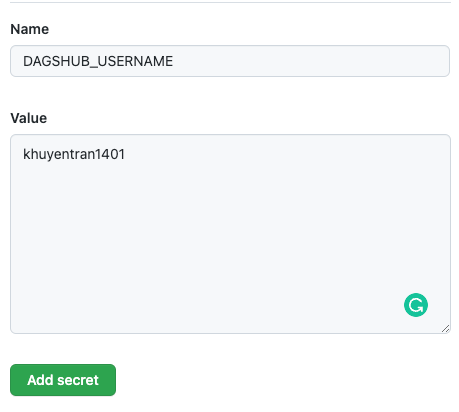
Now you can access the secret DAGSHUB_USERNAME using ${{ secrets.DAGSHUB_USERNAME }} .
steps:
  ...
  - name: Pull data
    run: |
      dvc remote modify origin --local auth basic
      dvc remote modify origin --local user ${{ secrets.DAGSHUB_USERNAME }}
      dvc remote modify origin --local password ${{ secrets.DAGSHUB_TOKEN }}
      dvc pull -r origin train_model
Run Tests
There are two parts to our code: training the model and deploying the model. We will write steps that make sure both parts can run without any errors and will work as expected.
Here is the step to test the processing code and the ML model:
steps:
  ...
  - name: Run training tests
    run: pytest training/tests
Specifically, we test the processing code and ML model.

The steps to test the deployment code include:
- Save model to BentoML local store
steps:
  ...
  - name: Save model to BentoML local store
    run: python application/src/save_model_to_bentoml.py
- Run the application locally and run tests to make sure the application works as we expected.
steps:
  ...
  - name: Serve the app locally and run app tests
    run: |
      bentoml serve ./application/src/create_service.py:service  &
      sleep 10
      pytest application/tests
      kill -9 `lsof -i:3000 -t`
Note: Here, we created an ML-powered app using BentoML.
Add and commit this workflow to the master branch on GitHub.
git add .github
git commit -m 'add workflow'
git push origin master
Add Rules
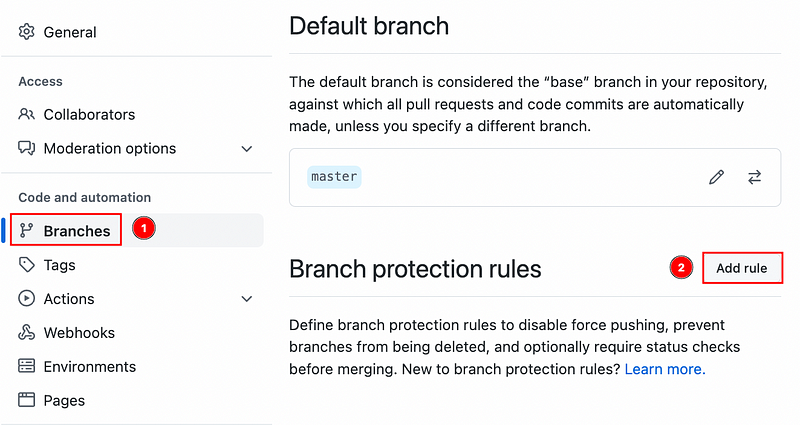
To make sure the code is available to be merged only when the workflow runs successfully, select Settings → Branches → Add rule.
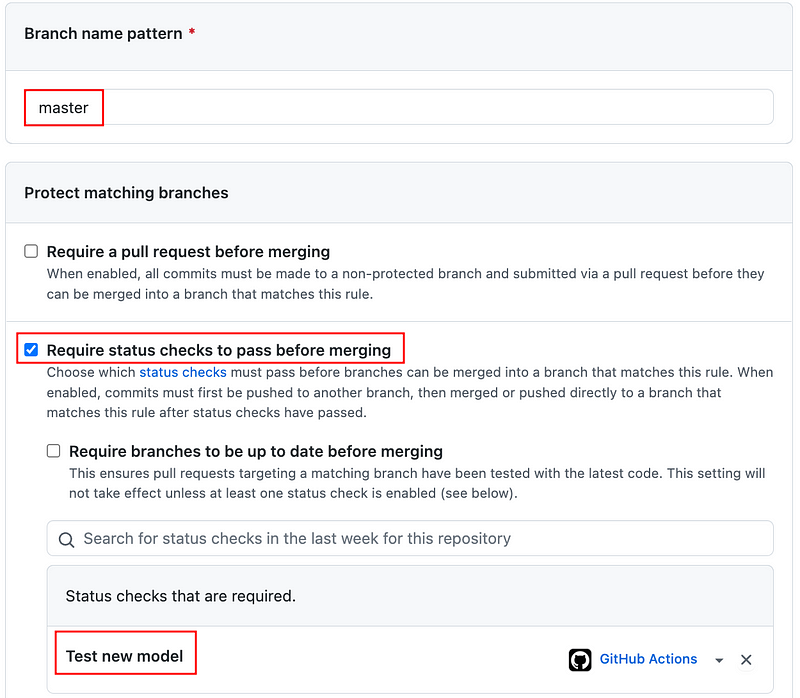
Add master as the branch name pattern, check Require status checks to pass before merging , then add the name of the workflow under Status checks that are required. Finally, click Save changes.
Now when you create a pull request, GitHub Actions will automatically run the workflow Test new model. You won’t be able to merge the pull request if the check does not pass.
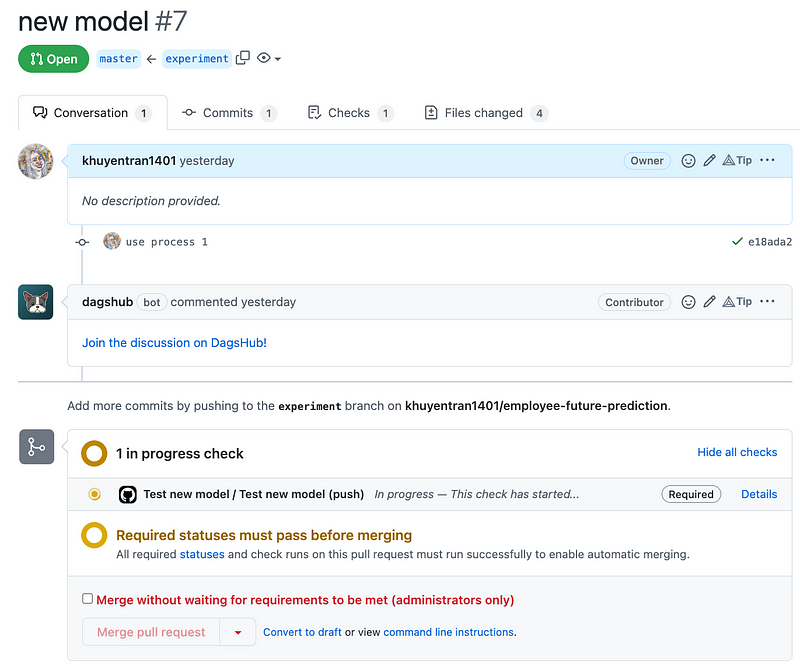
Clicking Details will show you the status of the run.
Full code for testing the training code:
name: Test new model
on:
  pull_request:
    paths:
      - config/**
      - training/**
      - application/**
      - .github/workflows/test_training.yaml
jobs:
  test_model:
    name: Test new model
    runs-on: ubuntu-latest
    steps:
      - name: Checkout
        id: checkout
        uses: actions/checkout@v2

      - name: Environment setup
        uses: actions/setup-python@v2
        with:
          python-version: 3.8
          cache: pip

      - name: Cache
        uses: actions/cache@v2
        with:
          path: ~/.cache/pip
          key: ${{ runner.os }}-pip-${{ hashFiles('**/dev-requirements.txt') }}
          restore-keys: ${{ runner.os }}-pip-

      - name: Install packages
        run: pip install -r dev-requirements.txt

      - name: Pull data
        run: |
          dvc remote modify origin --local auth basic
          dvc remote modify origin --local user ${{ secrets.DAGSHUB_USERNAME }}
          dvc remote modify origin --local password ${{ secrets.DAGSHUB_TOKEN }}
          dvc pull -r origin train_model

      - name: Run training tests
        run: pytest training/tests

      - name: Save model to BentoML local store
        run: python application/src/save_model_to_bentoml.py

      - name: Serve the app locally and run app tests
        run: |
          bentoml serve ./application/src/create_service.py:service  &
          sleep 10
          pytest application/tests
          kill -9 `lsof -i:3000 -t`
Deploy a ML Model on Merge with GitHub Actions
After merging the pull request, the model should automatically be deployed to the existing service. Let’s create a GitHub workflow to do exactly that.
Start with creating another workflow called deploy_app.yaml :
.github
└── workflows
    ├── deploy_app.yaml
    └── test_model.yaml
The first few steps of the workflow are similar to the previous workflow:
name: Deploy App
on:
  push:
    branches:
      - master
    paths:
      - config/**
      - training/**
      - application/**
      - .github/workflows/deploy_app.yaml
jobs:
  deploy_app:
    name: Deploy App
    runs-on: ubuntu-latest
    steps:
      - name: Checkout
        id: checkout
        uses: actions/checkout@v2

      - name: Environment setup
        uses: actions/setup-python@v2
        with:
          python-version: 3.8
          cache: pip

      - name: Cache
        uses: actions/cache@v2
        with:
          path: ~/.cache/pip
          key: ${{ runner.os }}-pip-${{ hashFiles('**/dev-requirements.txt') }}
          restore-keys: ${{ runner.os }}-pip-

      - name: Install packages
        run: pip install -r dev-requirements.txt

      - name: Pull data
        run: |
          dvc remote modify origin --local auth basic
          dvc remote modify origin --local user ${{ secrets.DAGSHUB_USERNAME }}
          dvc remote modify origin --local password ${{ secrets.DAGSHUB_TOKEN }}
          dvc pull -r origin train_model

		- name: Save model to BentoML local store
      run: python application/src/save_model_to_bentoml.py
We also use env to add environment variables to the workflow. The environment variables will be used in some steps in the workflow.
jobs:
  deploy_app:
    env: # Set environment variables
      HEROKU_API_KEY: ${{ secrets.HEROKU_API_KEY }}
      HEROKU_EMAIL: ${{ secrets.HEROKU_EMAIL }}
Next, we use BentoML to containerize the model and then deploy it to Heroku.

steps:
  ...
  - name: Build Bentos
    run: bentoml build

  - name: Heroku login credentials
    run: |
      cat > ~/.netrc <<EOF
        machine api.heroku.com
          login $HEROKU_EMAIL
          password $HEROKU_API_KEY
        machine git.heroku.com
          login $HEROKU_EMAIL
          password $HEROKU_API_KEY
      EOF

  - name: Login to Heroku container
    run: heroku container:login

  - name: Containerize Bentos, push it to the Heroku app, and release the app
    run: |
      cd $(find ~/bentoml/bentos/predict_employee/ -type d -maxdepth 1 -mindepth 1)/env/docker
      APP_NAME=employee-predict-1
      heroku container:push web --app $APP_NAME  --context-path=../..
      heroku container:release web --app $APP_NAME
Add and commit this workflow to the master branch on GitHub.
git add .github
git commit -m 'add workflow'
git push origin master
Now when you merge a pull request, a workflow called Deploy App will run. To view the status of the workflow, click Actions → Name of the latest workflow → Deploy App.
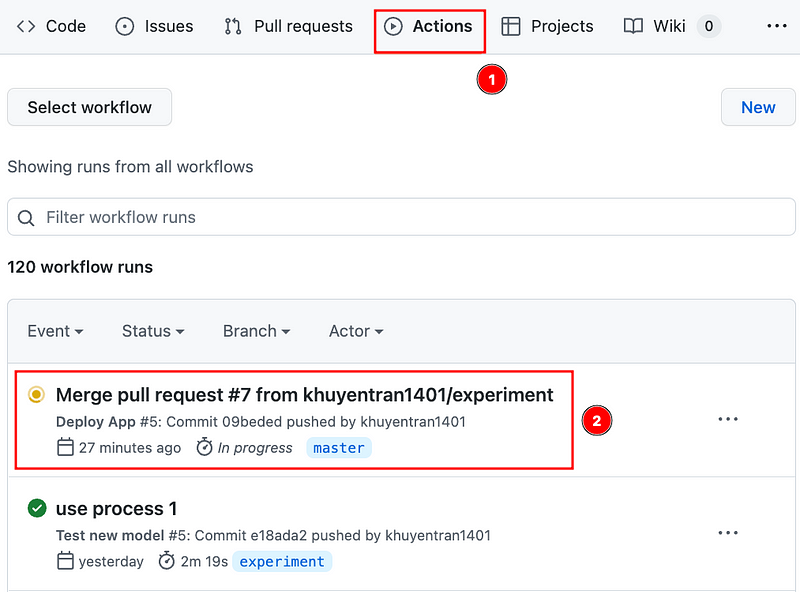
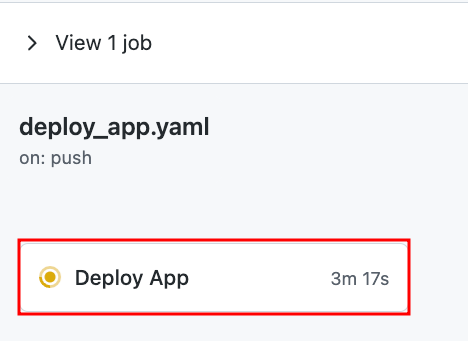
Now you should see your workflow running:
Cool! The website for this app, is now updated!
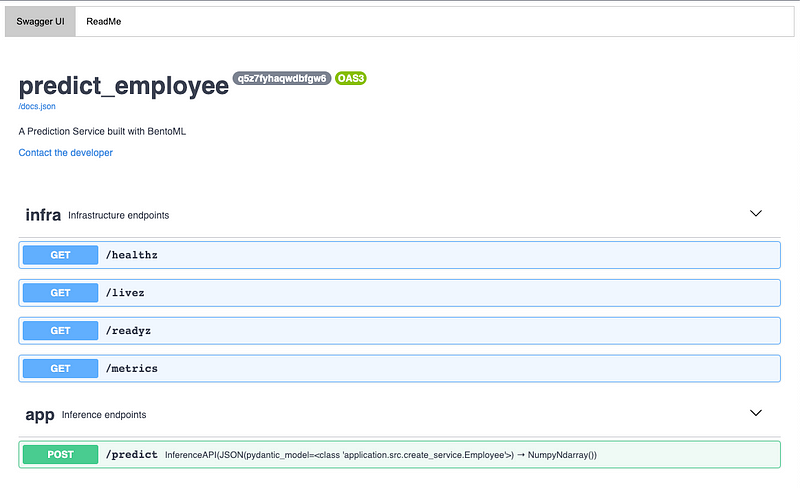
Since my Streamlit app makes the POST request to the URL above to generate predictions, the app is also updated.
prediction = requests.post(
    "<https://employee-predict-1.herokuapp.com/predict>",
    headers={"content-type": "application/json"},
    data=data_json,
).text[0]
Conclusion
Congratulations! You have just learned how to use GitHub actions to create workflows that automatically test a pull request from a team member and deploy the ML model to the existing service. I hope this article will give you the motivation to automate your tasks with GitHub Actions.
The source code of this article can be found here:
khuyentran1401/employee-future-prediction
Reference
Deploy to Heroku with github actions. remarkablemark. (2021, March 12). Retrieved May 31, 2022, from https://remarkablemark.org/blog/2021/03/12/github-actions-deploy-to-heroku/
Galvis, J. (2020, August 12). Using github actions for integration testing on a REST API. Medium. Retrieved May 31, 2022, from https://medium.com/weekly-webtips/using-github-actions-for-integration-testing-on-a-rest-api-358991d54a20
Ktrnka. (n.d.). Ktrnka/MLOPS_EXAMPLE_DVC: Mlops example using DVC, S3, and Heroku. GitHub. Retrieved May 31, 2022, from https://github.com/ktrnka/mlops_example_dvc